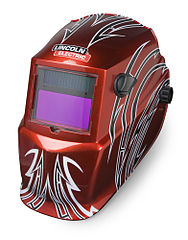
If your helmet looks boring and you feel that the aesthetics need to be improved then you should surely go ahead and read the article ahead. There is obviously a choice of purchasing a best helmet that has great graphics and looks and along with that welding is spiced up already. But this is an expensive choice to make. So if you want to limit your expenditure and still want a helmet with excellent graphics then you can go with the budget welding helmet or best is an option of creating one of your own. By doing this you can save a lot of money of yours.

Also if you already have one helmet then there is no need of buying another. You can enhance the old one only with less cost.
Make a custom welding helmet
You should go with the option of creating your own helmet and this can be done by yourself. So to do this by yourself you would need the following.
Some of the requirements are:
- Cutters, vinyl stickers and someone who will able to print the stickers successfully.
- A tape roll.
- Some tweezers.
- Knife.
- Scissors
- Alcohol
- Cutting mat
- Paper towel
And now to make your custom helmet you would require an area that is well ventilated. You might also need some breathing protection for this.

Now follow the below steps that will help you to deal and create the helmet of your custom style.
Step 1: designing the stickers
You can print your own design by yourself and you can also get this done by others. It is easily done if you have the vinyl sticker cutter. This will make the process much easier and help you do the work in less time and more easily. You can design your stickers using the adobe Photoshop too. This is a graphics and professional program that will help you in enhancing the helmet. The designs can be downloaded and this can be done on your choice.
Another alternative that could be there could be working with a person who has specialization in these tasks. If you cannot find any local company for doing this piece of work then you can choose the national level company.
Also note that you need to cover those designs with the tape so that they stay in their place intact.
Step 2: Get ready
Firstly you need to clean the helmet. This is to be done with the rubbing alcohol. Your stickers wont be useful unless you do this step. So it is important.
Step 3: place the sticker and peel
Firstly see the area where you want the sticker to be placed. Then the next step would be to cut it into smaller pieces so that the stickers fits in easily. Next you need to remove the backing of the sticker.

Step 4: stick it
The next step that we need to do is to arrange the sticker in place where you want to stick it. After you place it move your hands towards the ends this will help you to remove the bubbles. Then next the masking tape will keep your sticker intact and protect it.
Step 5: sealing
The most important thing is that the sticker should be at place. For this you need to seal it and protect it by applying heat.
- Use the acrylic sprat as this spray will be withstanding the temperatures and make your sticker permanent.
- By doing a little work you will be able to make a good custom helmet on your own. You will be saving a lot of money on this if you do it on your own. If you are having a helmet then it is good as it wont cost you much.
Conclusion
The custom helmet can be created easily just in a few steps. You will be saving a lot of money on it. It is preferable you do it on your own or hire a specialist who will make it more creative.
